LMDE2 - TeX Live 2016 のインストール(by ISO イメージ)!
Updated:
\(\TeX\) Live 2016 を、よくあるインストーラアーカイブをダウンロード&展開後にインストーラを起動してインストールする方法ではなく、 ISO イメージファイルを取得してインストールする方法についての記録です。
(\(\TeX\)とは、組版処理ソフトで、理系の論文作成等によく使用します)
0. 前提条件
- LMDE2(Linux Mint Debian Edition 2) での作業を想定。(他の Linux ディストリビューションでも同様)
- 当記事執筆時点で最新の “texlive2016-20160523.iso” を使用する。
1. ISO イメージの取得
こちら から好みのミラーサイトを選択後、 “texlive2016-20160523.iso” をダウンロードし、適当なディレクトリに配置する。
配置後に SHA-2(SHA-512) のハッシュ値を調べる。
$ sha512sum texlive2016-20160523.iso
c23f80a7018f99c6a0db1d6e9d2d90ac57a8c457d9767def793e5c266e6505f3f38d7cdc0be91e7959d86ab97abcaa85d5f15be08c0f711a01caff8ae149176c  texlive2016-20160523.iso
ハッシュ値が “texlive2016-20160523.iso.sha512” に記載のものと相違がないか確認しておく。(SHA-2(SHA-512) 以外に MD5 も用意されている)
2. ISO イメージのマウント
ISO イメージなので DVD に焼いてもよいが、当然ながらそんな面倒なことをしなくてもマウントすればよい。
$ sudo mkdir /path/to/texlive
$ sudo mount -o loop /path/to/texlive2016-20160523.iso /path/to/texlive
3. TeX Live 2016 のインストール
$ cd /path/to/texlive
$ sudo ./install-tl

====< 途中省略 >====

Actions:
 <I> start installation to hard disk
 <H> help
 <Q> quit

Enter command: I

====< 途中省略 >====
(大規模なソフトなので、時間がかかる)
4. ISO イメージのアンマウント
$ sudo umount /path/to/texlive
$ sudo rm -rf /path/to/texlive
5. 環境変数 PATH の設定
(以下は ~/.profile を編集する例)
File: ~/.profile
1
2
3
4
5
6
PATH="/usr/local/texlive/2016/bin/x86_64-linux:$PATH"
INFOPATH="/usr/local/texlive/2016/texmf-dist/doc/info"
MANPATH="/usr/local/texlive/2016/texmf-dist/doc/man:$MANPATH"
export PATH
export INFOPATH
export MANPATH
そして、即時反映。
$ source ~/.profile
6. インストールの確認
$ tex --version
TeX 3.14159265 (TeX Live 2016)
kpathsea version 6.2.2
Copyright 2016 D.E. Knuth.
There is NO warranty.  Redistribution of this software is
covered by the terms of both the TeX copyright and
the Lesser GNU General Public License.
For more information about these matters, see the file
named COPYING and the TeX source.
Primary author of TeX: D.E. Knuth.
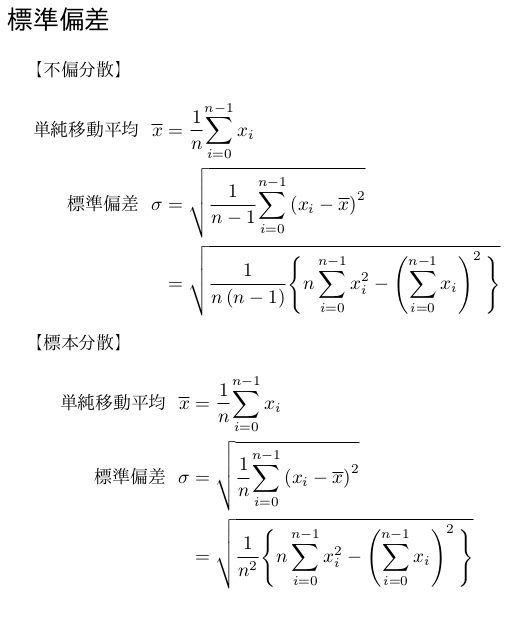
7. 動作確認用 tex ファイルの作成
File: test.tex
1
2
3
4
5
6
7
8
9
10
11
12
13
14
15
16
17
18
19
20
21
22
23
24
25
26
27
28
29
30
31
32
33
34
35
36
\documentclass[14pt,a4j]{jsarticle}
%--余白の設定 ( A4サイズ: 290 * 210 ) の半分
\setlength{\voffset}{10mm}               %用紙上部の余白
\addtolength{\voffset}{-1in}             %はじめからある余白を消す
\setlength{\hoffset}{15mm}               %用紙左部の余白
\addtolength{\hoffset}{-1in}             %はじめからある余白を消す
\setlength{\topmargin}{0mm}              %上部余白からヘッダーまでの長さ
\setlength{\oddsidemargin}{0mm}          %左部余白から本文までの長さ
\setlength{\headheight}{0mm}             %ヘッダーの高さ
\setlength{\headsep}{0mm}                %ヘッダーから本文までの長さ
\setlength{\textheight}{29\baselineskip} %本文の高さ
\setlength{\textwidth}{270pt}            %本文の幅
\setlength{\marginparwidth}{0mm}         %注釈の幅
\setlength{\topskip}{0mm}                %本文の上部から一行目までの長さ
\setlength{\baselineskip}{11pt}          %行の高さ
%--PageStyle設定
\pagestyle{empty}

\begin{document}

\noindent
\section*{標準偏差}
【不偏分散】
\begin{eqnarray*}
単純移動平均 \ \ \overline{x} & = & \frac{1}{n}{\displaystyle\sum_{i=0}^{n-1} x_{i}}\\
標準偏差 \ \ \sigma & = & \sqrt{ \frac{1}{n-1}{\displaystyle\sum_{i=0}^{n-1} \left( x_{i} - \overline{x} \right)^{2}} } \\
& = & \sqrt{ \frac{1}{n\left(n-1\right)}\Biggl\{n\displaystyle\sum_{i=0}^{n-1}x_{i}^{2} - \left( \displaystyle\sum_{i=0}^{n-1}x_{i} \right)^{2}\Biggl\} }
\end{eqnarray*}\par
【標本分散】
\begin{eqnarray*}
単純移動平均 \ \ \overline{x} & = & \frac{1}{n}{\displaystyle\sum_{i=0}^{n-1} x_{i}}\\
標準偏差 \ \ \sigma & = & \sqrt{ \frac{1}{n}{\displaystyle\sum_{i=0}^{n-1} \left( x_{i} - \overline{x} \right)^{2}} } \\
& = & \sqrt{ \frac{1}{n^{2}}\Biggl\{n\displaystyle\sum_{i=0}^{n-1}x_{i}^{2} - \left( \displaystyle\sum_{i=0}^{n-1}x_{i} \right)^{2}\Biggl\} }
\end{eqnarray*}

\end{document}
8. PDF の作成
まず、 aux ファイルを作成する。
$ platex test.tex
This is e-pTeX, Version 3.14159265-p3.7-160201-2.6 (utf8.euc) (TeX Live 2016) (preloaded format=platex)
 restricted \write18 enabled.
entering extended mode
(./test.tex
pLaTeX2e <2016/05/07> (based on LaTeX2e <2016/03/31>)
Babel <3.9r> and hyphenation patterns for 83 language(s) loaded.
(/usr/local/texlive/2016/texmf-dist/tex/platex/jsclasses/jsarticle.cls
Document Class: jsarticle 2014/02/07 okumura
)
No file test.aux.
[1] (./test.aux) )
Output written on test.dvi (1 page, 2304 bytes).
Transcript written on test.log.
そして、 PDF に変換する。
$ dvipdfmx test.dvi
test.dvi -> test.pdf
[1]
18736 bytes written
9. PDF の確認
(以下は公開の都合上 PNG 画像として切り取ったもの)

10. その他
他に、 \(\TeX\) Works や \(\TeX\) Studio 等の GUI ツールを導入するのもよいだろう。
11. 参考サイト
よくあるインストーラアーカイブをダウンロード&展開後にインストーラを起動してインストールする方法では(環境によっては)莫大な時間がかかりますが、 ISO イメージさえ用意しておけば、インストール作業自体にはそれほど時間はかかりません。
以上。

Comments